Introduction
Important Note: Research Planner will not be upgraded for use with Family Historian V7. In time, a plugin will be developed to migrate existing Research Planner Tasks and Templates to take advantage of the new Research Note and Autotext features in ƒh7.
Family Historian is an excellent program for recording the results of your Family History research, but it does not come with an inbuilt mechanism for planning (or tracking) that research in a structured fashion, although there are many features you can take advantage of to do so.
The Research Planner supports one approach to structured research planning and tracking. There are other approaches you may wish to consider, each with their own advantages and disadvantages, as documented at Planning and Tracking Your Research. If you’re looking for a simple ‘Jotter Pad’ approach, Research Planner is not your solution. If you don’t want to use “yet another plugin”, ditto – although you might find some useful techniques here to apply manually yourself.
So, why use Research Planner? After all, Family History research is not rocket science – every genealogy researcher knows that. However, the process of:
- Assessing what you already know about an individual
- Determining what else you want to discover about them
- Formulating a plan to discover new evidence
- Executing that plan
- Using any evidence found to update what you know
can be surprisingly error-prone.
You forget to search a particular source. You do it twice, and don’t make a note of your exact search terms so you can’t be sure if you need to do it yet again. You order the same birth certificateBirth Certificates are a formal record of the birth of a child, and typically include the date and place of birth together with information about the parents. twice because you didn’t make a note when you ordered it the first time, and it’s still the wrong one second time around! You forget how to do that weird search you did 10 years ago for another individual, and for the life of you, you can’t remember what website you used… And it’s tedious to make a note to do all the standard searches for BMDAn abbreviation for Birth Marriage and Death events. when you’ll remember it anyway. Usually.
The Research Planner tries to make it easier to record what you intend to do, and how each search turned out, to avoid the common pitfalls as far as you can; to plan research activities based on past experience; and to keep track of your research activities.
It allows you to plan and track your research Tasks either by using a custom Family Historian Fact (Attribute) or by using Family Historian Note records. It allows you to create custom tasks, optionally based on Templates that you have predefined; or to quickly create multiple standard tasks, again using templates. It supports Tags to identify Research Planner tasks, and Groups to associate related tasks; and provides a query that allows you to view tasks based on a flexible combination of filters. It is highly configurable, so you can choose what elements to use in your tasks and what to call them.
It does not try to dictate methodology: you can plan and/or document your research in as much or as little detail as you like, and configure the plugin to support your approach.
This guide assumes you are familiar with the basics of using Facts, Notes and Queries within Family Historian. It does introduce some new concepts that you should familiarise yourself with: Tasks, Templates, Tags and Groups
Key Concepts
Tasks
A Task is a research activity associated with a single individual, and optionally linked to a single source. For example:
- Locate the birth registration of Amy Buggins somewhere in Lincolnshire between 1870 and 1880
- Search the 1881 census of England for the household of Fred Turner, painter and decorator, probably living in Suffolk with his wife Ada
You can specify a Task narrowly:
- Search the Parish Registers for Cirencester for the burial of Thomas Tubney between January 1884 and January 1885
or broadly:
- Search the GRO indices for the birth registrations of all children named Mary Ann Maddox between 1860 and 1870, and correlate them with all likely death marriage and census recordsCensus records are national collections of population statistics. They usually record details about members of a household on a particular date, and are typically collected every ten years. to identify all possible candidates for Great-grandmother Maddox.
For every Task, you can optionally define a brief Title, a detailed Objective, a Status, a Priority, and Notes about the progress and results of your research; as well as a Due Date and/or Updated Date.
Using the plugin options, you can change what most of these fields are called, and choose not to use one or more of them.
You can find more detail on the content of Tasks here, and instructions for creating them here.
Templates
There is often a common set of searches that you will carry out for any individual – Birth, Baptism, Marriage, Death, Burial, Censuses, Children etc (and perhaps some preferred resources where you’ll carry out those searches).
And there are also searches that you carry out very rarely, and you want to record the details of how you would do it if you ever had to do it again. (Deaths in Ohio – I’ve done it once, and don’t want to forget all the ins-and-outs, even if I never use them again – until I find another ancestor who emigrated to Ohio in his dotage – I don’t want to reinvent that particular wheel).
A Template is a predefined Task. You can create a task starting with a template and edit the task to be specific to an individual; or you can create a number of standard tasks in a single operation for an individual (and edit them later if necessary within Family Historian). You can find more detail on creating and managing Templates here
You can create Templates that are usable in all Projects – templates that don’t depend on any projectA Project is a Windows folder, created by Family Historian, which contains all your Family Tree information recorded in Family Historian. Normally located in the Documents\Family Historian Projects folder. specific information, called Global Template’s; these will be available within all Family Historian Projects. However, if you wish to include project-specific information in a template (e.g. a Source selection), then your template will be a Project Template and only available in the project within which you created it.
Tags
Jane TaubmanJane Taubman is the originator and administrator of the Family Historian User Group. She has been using Family Historian since Version 2 and researching her tree on and off since she was 19. She runs occasional Family Historian Courses. introduced the concept of tags within Family Historian in her blog post on the subject. Tags are brief markers (starting with ) within a Note in Family Historian (any kind of Note – Local, Shared, Fact etc.). Using a Tag within Tasks makes it easier to locate them.
Using the plugin options, you can specify a standard Tag to include in all your tasks to help locate them, or decide not to include a standard Tag at all. (If you’re using Note records to store your tasks, you MUST include a Tag to distinguish a Research Task from other Notes).
You can manually include additional tags within a Task or a Template to slice and dice your tasks in a way that suits you.
You can find more about searching for Tags here.
Groups
Sometimes a research problem involves more than one task/or and more than one individual. For example:
- Margaret Jones (1865-18913) was born at Fron Oleu, Llanfaglan, Caernarfonshire in December 1865. Her mother was Margaret Jones, but her birth certificate has no father’s name, so she was illegitimate. Can I identify her father? Almost certainly, resolving this question will involve Tasks defined for two individuals: who were Margaret Jones (the mother’s) Friends Associates and Neighbours? and is there anything in various records for Margaret Jones (the daughter) that might identify her father?
Or:
- I intend to search a number of parishes for a baptism record, and also the records of nearby non-conformist chapels. If I create one task per parish/chapel, but group them all as e.g. ‘Search for Baptism of Adeline Offerton circa 1892’, once I find the record I’m looking for, I can easily find all the associated tasks and mark them as no longer required; and also keep track of where I have and haven’t yet searched if I decide to widen the search.
Using the Research Planner, you can create multiple research tasks for the individuals concerned, each addressing one element of a problem, and allocate those tasks to a single Group (with a name of your choice). The query provided with the plugin will allow you to review just the Tasks in that Group to assess progress.
You can configure the plugin not to use Groups, or to rename Group to something that makes more sense to you if you wish – e.g. Project or Assertion – using the plugin options.
An alternative to using Group is manually adding extra Tags within a Task.
What’s New in Version 2?
There are a number of new features in Research Planner Version 2:
- You can choose between using Fact (a custom AttributeUsers of Family Historian can customize fact definitions, or create their own fact definitions to more closely match they way they want to work.) or Note records to store your tasks.
- You can configure the plugin to choose which task fields to use and/or what to call them.
- You can configure the plugin to include Due, Updated and/or Fact DatesWhen an Event happened, or an Attrribute was true..
- You can mark tasks with Tags, and use Groups to organise them.
- You can customise the contents of a Task before creating it (based on a Template if you wish), as well as create standard template-based tasks in bulk.
- The plugin installs a very flexible Query, and also provides a tool to find all tagged items.
Installing the Plugin
The Research Planner is available from the Family Historian Plugin storePublished plugins can be downloaded from the Family Historian Plugin Store..
When you run the plugin for the first time, it will check for the existence of two essential prerequisites and prompt you to install them if you haven’t already done so:
Support for the “pl module”:
- pl is a library module used by many other pluginsPlugins are small programs that allow new features to be added without upgrading Family Historian itself; some plugins are written by Calico Pie and others are written by users., so you may already have it installed. It will be downloaded if necessary from the Calico PieCalico Pie Limited is a UK software house, and the publishers of Family Historian. website.
- Support for the “zip” module: zip is a library module used to extract zip files. It will be downloaded if necessary from the Calico Pie website.
Users of CrossoverCrossOver is a Microsoft Windows compatibility layer available for Linux, macOS, and Chrome OS. It enables many Windows-based applications to run on Linux, macOS, or Chrome OS operating systems. CrossOver is a retail product developed by CodeWeavers and based on, PlayOnLinuxPlayOnLinux is a graphical front end for the Wine software compatibility layer which allows Linux users to install Windows-based video games, Microsoft Office, Microsoft Internet Explorer, as well as many other applications. https://www.playonlinux.com/en//MAC and WineWine is a free and open-source compatibility layer that allows computer programs developed for Microsoft Windows to run on Unix-like operating systems. https://www.winehq.org/ should consult the instructions for installing these libraries in their environment.
The first time the plugin runs (and the first time after any new version is installed), it will also check for the existence of this Help file and download the latest version if necessary (as a zip file which it extracts into a sub-directory under your Plugin data folder). If for any reason, the Help File can’t be downloaded, the plugin will continue to work (but without Help).
If the error persists, you should download the Help zip file from Research Planner Help 2.0.zip and extract its contents (a single directory) into the Research Planner plugin data directory: C:\Program Data\Calico Pie\Family Historian\Plugin Data\Research Planner.dat or its equivalent in your environment (documented at Family Historian Program Data Folder). (You may need to tell File Explorer to show hidden files to be able to see this folder). This manual extraction may also be necessary if you’re running within a Crossover, PlayOnLinux/Mac or Wine environment.
The first time version 2 of the Plugin runs it will prompt you for your chosen Options.
If you’re upgrading from Version 1 you should review Upgrading from Version 1.
The Task Fact
If you decide to use Facts to track your research, the plugin will create the necessary Task Fact (Attribute) as part of a Research Planner Fact SetA Fact Set is a defined list of types of Facts - that is types of Events and Attributes.; you will have to restart Family Historian before this can be used. If you have your own Task attribute defined, the plugin will use that fact definition, and not create its own. See The Research Planner Task Definition if you want the technical detail of the fact definition used by the plugin.
Queries
The plugin will create a query (either Research Planner (Facts) or Research Planner (Notes) ) to allow you to view all your tasks or a filtered subset within Family Historian.
Upgrading from Version 1
There are a few things to be aware of when upgrading from Version 1.
- Existing (Attribute-based) tasks will continue to work; however, if you change the labels for any field when setting options the existing tasks will not be updated. You may wish to use the Search and Replace Plugin to update existing tasks to use the new labels. And if you prefer to use Note records to store your Tasks, you may wish to convert existing Fact-based tasks.
- The format of a task has been updated to accommodate extra fields and improve layout; any tasks you made in Version 1 will not be updated to the new format or to include new fields or exclude unused ones.
- Any templates you made in Version 1 will work in Version 2 (and be treated as Global templates) but if they have sources defined and you make any changes, you will need to save them as new Project templates.
- The new query will work with Version 1 and Version 2 Tasks, and replace the queries you previously downloaded, so you can delete those queries (or keep them if you find them useful and are using Facts to store your tasks).
- If you choose to continue using Tasks, you can continue using any reports you’ve downloaded, but you may wish to decide if the new approach to reporting suits you better.<
Options
The Research Planner is highly configurable, so it is worth taking some time to consider how to use it to suit you best. The options are accessible by using the Options button anywhere within the plugin. Set them as you wish and select Confirm to save them or Cancel to discard changes. Use Reset to reset them to the default settings (as shown). Help displays a Help page about the Options.
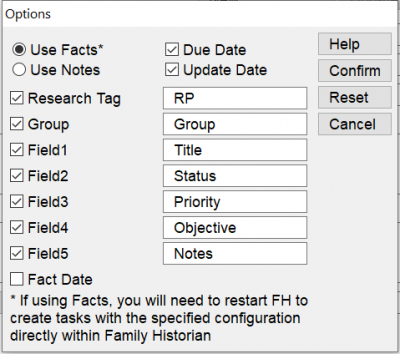
Use Facts versus Use Notes
You can select one or other of these options to determine how Tasks are stored within Family Historian. See The Structure of a Research Task and Should I Use Facts or Notes to help you decide. Your choice here will determine which other options can be configured. The default is “Use Task Attribute” for backward compatibility with Version 1.
Due Date
This is a field that accepts any date text that is valid within Family Historian, to specify when you intend to complete the task. Recommended (default) value is OFF but turn it ON if you want to be strict with yourself.
Update Date
This is a field that accepts any date text that is valid within Family Historian, to specify when you last updated the Task. Recommended (default) value is OFF but turn it ON if you want to be strict with yourself. (When creating tasks within the Research Planner, Update Date defaults to the date the task was created.) If you use Shared NotesFamily Historian version 6 and below supports two types of Notes: Local notes (associated with a single person, record, or fact); and Note Records (sometimes called Shared Notes), that can be linked to multiple records and/or facts. Version 7 introduced to store your Tasks, Update Date will be updated automatically; if you use Facts (AttributesEvents are things that happened to an Individual and Attributes are things that described them.) then you must update it manually.
Research Tag
Select this is you want all Tasks created to include a Tag to identify them as being created by the Research Planner. (If using Shared Notes, you MUST include a Tag). You can specify what Tag to use (the value you specify will be prefixed within Tasks by ). Recommended (default) value is ON with a Tag value of RP.
Group
Select this if you want the capability to Group Tasks together. You can specify what label to use for the Group field (Group, Project, Assertion or anything else that makes sense for the way you work or for your language.). Recommended (default) value is ON; however, if you want a very simple implementation of a To-Do list, turn it OFF.
Field1
This is a single line of text. Select this if you want to give your tasks a Title (the default label, which you can change if you wish). Field1 will always be used as the Attribute Value if you’re using Attributes to store Tasks. Recommended (default) value is ON so that you can quickly distinguish between different Tasks for an individual.
Field2 and Field3
These are single words used to categorise Tasks. By default, they are named Status and Priority, but you can rename them if you want to categorise your tasks differently. Default value for both fields is ON but if you want a very simple implementation of a To-Do list, turn them OFF. You can enter any value you choose into these fields when creating and updating a task, but you will want to decide on a simple scheme (High/Medium/Low or 1/2/3) to make your life easier.
Field4
This is a multiline field (ideally a single paragraph). By default, it is called Objective, but you can rename it. Default value: ON but if you want a very simple implementation of a To-Do list, turn it OFF.
Field5
This is a multiline field, as long as you like. By default it is called Notes, but you can choose to rename it to e.g. Progress. Recommended (default) value is ON as this is where you will record the progress and results of your task.
Fact Date
This can be included if you’re using Facts (Attributes) to store your Tasks. It is intended to allow you to control with great precision where in the Fact List for an Individual a Task appears. Default value is OFF. Some people may choose to use Fact Data as a Due Date.
The Structure of a Research Task
A Task holds all the information about a research activity for a single individual, at whatever level of complexity and detail you choose to work with.
Tasks can be stored with Family Historian either as a Fact (belonging to an Individual) or as a Note record (linked to an Individual). Each method has advantages and disadvantages, so you should think about what might work best for you. See Should I Use Facts or Notes to help you decide. By default, Research Planner version 2 uses Facts (for backwards compatibility with version 1).
What does a Task contain?
As default, every task will be structured as follows (almost all of this is configurable – you can rename the fields, use them for something else, not use them at all, add some dates (due, updated, fact)… make the structure your own.)
You can see below the contents of a task made with a Fact or a Note.


Title
A one-line description of the research activity at hand. If using Facts, this will become the Attribute value.
Individual
Identifies the (mandatory) individual to whom the Task applies. For Facts, the task is associated with the relevant Individual; for Notes, the note is linked to the Individual but it can be helpful to see them identified within the Task by Record IDEvery record in Family Historian has a numeric Record ID, which uniquely identifies it within its type of record. and Name. It is recommended that you don’t edit this line.
#Tag
A brief marker to identify items created by the Research Planner plugin.
Group
A one-line identifier to associate related tasks.
Status and Priority
One-line fields for categorising tasks. Every Task has a natural life cycle, changing status (for example) from ‘Planned’ to ‘In Progress’ to ‘Complete’. It may also detour via ‘Pending’ while you are waiting for something to happen before you can make more progress – for example, the arrival of a document you’ve ordered, or a trip to an archive location. If you’re really unlucky, it will move from Completed to In Progress, when some new evidence comes in from left field to turn your conclusion upside down. And you may decide that some Tasks are more important (or urgent) than others – e.g. High, Medium or Low Priority, or 1, 2 and 3.
Objective
A multiline field (ideally a single paragraph) to provide more detail than the Title about what the Task is intended to achieve and how– for example, you may want to constrain the possible range of birth dates that you intend to search.
Notes
At every point in the lifetime of a Task, you will want to record progress information, including the final outcome of your search. This multiline multi-paragraph field lets you record this progress in as much detail/at as much length as you wish, for example:
“Ordered certificate X – not the right one– try again.” “Searched database X on date Y – nothing found”, “Eureka – found her birth in the XX parish records” “Failure – she does not appear to have been baptised in Parish A”.
Linking Tasks to Other Records
It isn’t necessary to link Tasks to other records within Family Historian, but there are circumstances in which you may find it useful.
- If you link a Task to a Source, then you can query all Tasks linked to that Source. Perhaps you only have intermittent access to a source – when you visit an archive, when an online provider gives free access for a particular period, when you only subscribe to a website for a limited time. If you don’t want to miss the opportunity to do a piece of research linked to a specific Source, link the Task to the Source and use the Research Planner query to identify the work you need to do. However, be aware the query only looks at the first Source linked to the Task.
- If you link Sources to Repositories as part of your routine method of working, and have linked some Facts to Sources (via the Facts tab) you can use the Research Planner query to identify the work you need to do at a physical RepositoryA repository is a place (physical or online) where collections of original source data are stored and maintained. (say, Worcester Archives) or when you have access to a particular website (perhaps one that is offering free access on a particular date). The query only looks at the first Repository linked to the first Source linked to the Task.
- Do you use spreadsheets or other documents to record activity and/or progress on a Task? If you’re using Facts to track your Tasks, you can link a Task via a Media recordWhen you add a picture, video, sound recording, document file etc into a Family Historian project, a Media record is created to represent that media item within the project; the Media record includes a link to the actual Media file. to that file, to access it quickly from the task. You cannot add Media to a Note record, but you can put the Note Record and the Media Record in the same Named List. (The Plugin won’t do this for you – you need to do it directly within Family Historian).
- The Notes text will usually be sufficient to record the progress and outcome of a Task. However, you can link a Task (via the Add Note option for the Fact on the All tab of the Properties box) to one or more new or existing Shared Notes. You cannot link a Note Record to another Note Record, but you can add it to a Named List alongside other Note Records. (The Plugin won’t do this for you – you need to do it directly within Family Historian). Do remember to use [[privacy markers]] in these extra Notes to stop them appearing in reports unexpectedly.
Should I Use Facts or Notes
The plugin supports two methods of storing Research Tasks within Family Historian:
A custom Fact (Attribute) called Task Note records.
Each method has advantages and disadvantages which you should take into account when making your choice.
Facts
- Can only be linked to a single individual
- Can be linked to one or more sources (Research Planner will only make the link to the first source)
- Can be linked to a Media record (e.g. to a tracking spreadsheet or word document)
- Can be linked to additional Notes if necessary via the All tab on the properties box
- Cannot be linked to PlaceAccording to GEDCOM, a Place should hold "The jurisdictional name of the place where the event took place…" or Family record types
- Links are easily visible from the Property tab
- Updated date must be updated manually
- Can create Tasks in Family Historian easily via the Fast-Add menu
- Can query by Fact Type to review Tasks
- Reporting options are limited and hard to filter
- Cannot be added to Named ListsNamed Lists are a way in FH to group related items — which can be records of any type(s) — so that you can easily find them to work with.
Notes
- Can be linked to multiple individuals (Research Planner will only make the first link)
- Cannot link to a Media record
- Cannot link to additional Note records
- Can be linked to Place or Family recordsFamily records store information about families, and links to all the Individual Records for those individuals who make up a family. You can view and edit Family records in the Property Box Dialogue. within Family Historian
- Research Planner includes the identity of the linked Individual within the Note to improve visibility. A linkage can be seen easily from any record to which the Note is linked; however, must use View Record Links or Where Used Record Links plugin to view all links to the Note
- Updated date is automatically updated
- Can create Tasks in Family Historian via Add Note but need to create layout/labelled text manually or copy another note to get Research Planner layout.
- Can query Notes that include the mandatory Research Planner tag.
- Reporting options are limited and hard to filter
- Can be added to Named Lists alongside other record types (including Media and other Note records)
Converting between Facts and Notes
The Research Planner allows you to convert Tasks stored as Notes into Tasks stored as Facts, and vice versa (use the Convert button on the Tools tab). If you’ve configured the plugin to use Notes, you’ll be able to Convert To Facts by specifying a Tag to include in the resultant Notes); if you’ve configured the plugin to use Facts, you’ll be able to convert Notes to Facts by specifying a Tag to identify the notes.
In both cases, you’ll be offered the option to delete the originals once the conversion has taken place. Conversion should not result in the loss of any data. However, it is recommended that you run the conversion without selecting the delete option and check that the results are as you would wish; the plugin will exit after conversion and display results the original and new records for you to check. Once you’re happy, you can delete the original records from the results window; or you can undo the plugin edits and rerun the conversion with the delete option selected.
The Research Planner Fact Definition
If you don’t already have an Attribute called Task, the Research Planner will install a fact set called Research Planner, with a single Fact (Attribute) called Task. By default, the fact definition will look like this, but if you change the plugin configuration options it will be modified to reflect your choice of fields to use and what to call them. (Remember this if you modify the Task definition; any changes you make will be lost if you subsequently change the plugin options.)
Note: if the plugin has to create the Fact definition, you will need to restart Family Historian to use it. And if you change the Research Planner options , you will need to restart Family Historian before you can add tasks with the new options without using the Research Planner.
 .
.
Note, the Fact Normal Timeframe is set to Post-Death (so Facts sort to the end of the list for an Individual). You can edit this manually once the Fact Set is created or updated; and/or configure the Plugin to include a Fact Date in the Fact definition.
.
The Auto-Create (default) note in full is:
  #RP
  Group:
  ____________________

  Status:
  Priority:
  ____________________

  Objective:
  ____________________

  Notes:
Managing Task Templates
A Template defines a standard set of contents for a Task and is intended:
To speed up the creation of research tasks that you commonly carry out To allow you to record the details of specialised research tasks for reference in the future
The Manage Templates tab contains the tools for creating and managing templates. You can also create and update Templates from the Making Tasks from Text tab.

1. Choose template
Every template must have a unique name. Use this dropdown box to select a template to view or edit.
2. Template type
Templates can be Global (available to all your projects); or Project (available to a single Project). A Global template can’t specify a Source because Source recordsSource: "where information was found". This could be anything from an archive in a county records office, a book, or even a relative's recorded recollection. Citing your Sources helps to show how you reached a particular conclusion about an Individual. within Family Historian are project-specific.
3. Create a new template
You will be asked to specify a (unique) Template Name and a Template Type (Global or Project). A blank template will be created and presented to you for editing (remember to Save it once you’ve edited it – although you’ll be reminded!)
4. Copy button
You will be asked to specify a (unique) Template Name and a Template Type (Global or Project). A copy of the original template will be created and presented to you for editing (remember to Save it once you’ve edited it!)
5. Save button
Save any changes you’ve made to the template definition you’re viewing or editing. If you don’t save the changes, you will be prompted to do so (or discard changes) if you navigate away from the “Manage Templates” tab or change the template you’re working with.
6. Rename button
Change the name of a template. You’ll be prompted for a new unique template name. You can’t change the template type by renaming it, and renaming it won’t save any changes you’ve made to the original (you’ll need to save before renaming to do that).
7. Delete button
Delete a template. This won’t affect any facts previously created from the template.
8. Template contents
This is where you specify the default contents for a Research Task created from this template. You don’t have to complete all (or any) fields; and if you’ve modified the plugin options, some fields will be hidden or have different titles. If you haven’t selected a Template, you won’t be able to edit these fields. Note: if you’ve previously created any facts from this template, they will not be affected by any changes you make here.
Not all Task fields (even if you’ve configured the plugin to use them) can be included in a Template:
Tag is standard across all Tasks, so isn’t included. Group and Individual are specified when you make a Task. Dates (Due, Updated, Fact Date) can be specified when you make a single Task, but not when you make standard Tasks in bulk as they will differ for every task, and so are not included in a Template. Default values are used when you make standard Tasks in bulk – Updated and Fact Date will default to Today; Due date will default to blank.
9. Source…
For Project templates, you can select a default source within Family Historian, using the button. The source you select will be displayed in the box. You cannot specify a source for a Global template, as source records are project-specific.
10. Help button
Open the Help file
11. Options button
Configure the behaviour of the plugin.
12. Exit button
Close the plugin.
Creating and Editing Tasks
Using the Research Planner, you have a few options for creating tasks:
From the Make Task tab:
- From Text, by entering all the fields from scratch
- From Text, by selecting a Template as the basis to work from and then modifying the fields as you wish
- In Bulk, by selecting one or more templates and creating tasks from them without any modification
With Family Historian:
- If you’re using Facts, you can use the Quick-Add menu for an individual to add a blank Task Fact. You can also copy and paste tasks using the standard Family Historian facilities.
- If you’re using Notes, you can copy an existing Research Planner Note, link it to an individual and edit it (error prone, so not recommended).
Once a task is created, all subsequent changes are made using the standard Family Historian facilities; no changes you make in the Research Planner will affect existing tasks.
Common Elements When Making Tasks
Whichever option you choose to make tasks within the plugin, there are some common user interface elements to understand. These appear at the top and bottom of the Make Tasks tab.

1. Select Individual
You must select an Individual to associate with every task created. Use the button to select an Individual within Family Historian; the name of the person selected will be displayed.
2. Group
This field can be used to name a Group of related tasks to which the task being created will belong – or it can be left blank. It will not be displayed if you’ve chosen not to use Goups.
3. Make Tasks from Text
Use this tab to make customised tasks, starting from a template or entering everything from scratch. For more detail see Making Tasks From Text.
4. Make Tasks in Bulk
Use this tab to make multiple standard tasks at once. For more detail see Making Tasks In Bulk.
5. Help
Opens the Help file.
6. Options
Allows you to review of edit the plugin options.
7. Exit
Closes the plugin.
8. Task History
Displays an summary history of the tasks created in this session using the plugin (Individual, plus task Title and Group if in use). This is displayed so that you can keep track of the work you have done without exiting.
The display can be closed and expanded using the arrow marker at top left; closing it will make more space available for viewing and editing task contents.
Making Tasks from Text
To make tasks from text (tasks which you can customise before creation) select the From Text tab within the Make Tasks tab.

1. Template
If you want to start from a Template to create your text and then edit it to be more specific, select the template from the dropdown list and the task contents will be populated from the template.
2. New template
Once you’ve created some task contents, you may decide that you want to create a template using them. The New button will prompt you for a template name (which must be unique) and a template type.
Note: if you have selected a Source for your task, you can only create a Project template.
3. Update template
If you’ve selected a template from which to create a task, you can update that template to include any edits you’ve made here.
Note: If you’ve selected a Source, you will not be able to update a Global template.
4. Task contents
This is where you enter the data for your task, either starting from the contents of a template or from scratch. You don’t have to complete all (or any) fields; and if you’ve modified the plugin options, some fields will be hidden or have different titles.
Use the Source button if required to select a source from within Family Historian.
5. Clear contents
Clear the task contents and template choice if any to start again. This will not affect any template definition.
6. Make task
Make a task using the contents provided.
Note: If you’ve configured the plugin to include Updated Date in your tasks, it will be set to Today.
Making Tasks in Bulk
To make tasks in bulk (standard tasks without customisation) select the In Bulk tab within the Make Tasks tab.

1. Template List
Choose one or more Templates for the Tasks you wish to create.
2. Clear button
Clear the Template selection.
3. Make button
Make Tasks from the selected Templates.
Note: If you’ve configured the plugin to include one or more dates in your tasks, they will be set as follows:
Update Date: Today Fact Date: Today Due Date: Blank
Miscellaneous Tools
On the Tools tab, the plugin provides facilities to Search for tagged items , to Convert between Notes and Facts, and to Download and install optional Reports.

1. Find Items button
Search Family Historian project for ALL items containing a specified Tag.
2. Convert button
If you’ve configured the plugin to use Notes to store Tasks, this button will convert any Tasks made using Facts into Notes. And vice versa, if you’ve configured the plugin to use Notes.
3. Download Report button
This button will download and install a report based on either Facts or Notes (depending on your decision on how to store your tasks).
4. Help button
Open the Help file
5. Options button
Open the plugin Options dialog.
6. Exit button
Exit the plugin.
Finding and Querying Tasks
Research Planner supports two ways of querying your Tasks: the Research Planner query and (if you’re using Tags) the Find Items option within the plugin. If you’re using Tags and have Family Historian version 6) you can also use the Family Historian Edit > Find to search for a given tag anywhere within your Family Historian project. Experiment with them to determine what suits you best.
The Research Planner Query
The plugin will install a query – either Research Planner (Notes) or Research Planner (Tasks) – based on the options you have chosen, to display details of tasks according to a set of filters you set.

To filter the results, you can optionally specify any or all of:
- A Group
- A Tag
- A Status value
- A Priority value
If you’ve configured the plugin to rename or not use Tags, Groups, Status or Priority, the filters available will be modified.
You can also optionally specify a word or set of words to be found anywhere in the Task definition; likewise in the first Source linked to any task or the first Repository linked to that first Source.
Using this query you can locate a very broad or narrow set of results to allow you to manage your research.
Note: this query is created as read-only and will be overwritten every time you modify the Options within the Plugin. If you wish to modify it, make a copy and modify the copy.
Research Planner Find Items
On the Tools tab within the plugin, there is a button Find Items which will search every instance of a text field within your project (not just within Research Planner tasks) for a Tag that you specify and return a set of results for you to use as necessary.
Family Historian Edit > Find
If you have Family Historian 6, the menu item Edit > Find will allow you to search for a tag (remember to prefix it here with a ) within specified records and field types. It displays more summarised results than the Research Planner Find Items facility but does allow you to constrain what is searched.
Reporting
The facilities available in Family Historian 6 do not make reporting on Research Tasks as flexible or well laid out as I would wish.
If using Facts, from the Tools tab you can download a report Tasks – Individual (Facts) which will display ALL Tasks (without filtering) for a list of Individuals.
If using Notes you can download a report Tasks – Individual (Notes) from the same place, which will display ALL Notes (not just Research Task Notes) for a list on Individuals.
In both cases, you can choose the records for the report by running the relevant Research Planner Query, selecting the column of Individuals found and either adding them to a Named List or setting a Flag on them, and then populating the report record set using the Named List Members or Has Flag query.