Introduction
IUP is a very powerful tool for building graphical user interfaces (GUI), but it’s fairly unforgiving and the IUP Documentation is a little sparse especially when used with LuaThe language in which Family Historian plugins are written.. This page contains handy tips for the various options of dialogue building.
When you are working on developing dialogues, always save before running, as if you get it wrong the dialogue will not appear and you will need to kill ƒh, using task manager to reset it.
Dialogues are built using a fairly simple nested table containing the controls. A control can be any of a selection of items, including labels, input boxes, buttons and many others.
Import Family Historian 7 note
For PluginsPlugins are small programs that allow new features to be added without upgrading Family Historian itself; some plugins are written by Calico Pie and others are written by users. that use Lua to work correctly, you must include the following in your code before any IUP functionality is called:
require("iuplua");
iup.SetGlobal("CUSTOMQUITMESSAGE","YES");
Building Blocks
When building a dialogue, it’s best to sketch what you want on a sheet of paper, or a wireframe tool like framebox.org or balsamiq.com, that way you can see the components you need to add.
Here is an example dialogue, that was drawn in framebox:
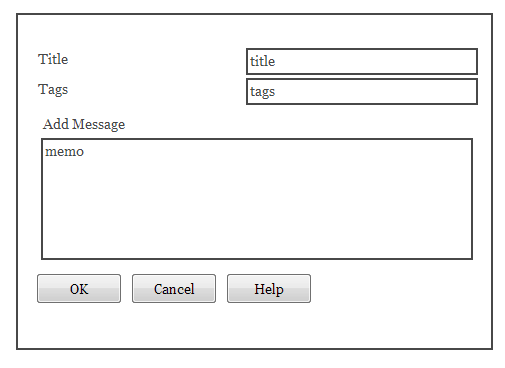
There are 9 visual controls on the dialogue, consisting of three labels, two single line text boxes, a multiline text box and three buttons.
For each control you need to get information from, or interact with, you need to give them a name, but for other items you simply need to use the constructor.
In your plugin you need to define the inner most items first; a bit like building a set of Russian dolls, you need to put the smallest ones together first.
Creating Components Part 1
So lets define the 3 buttons:
local btn_ok = iup.button{name="ok", title="OK",
    action = function(self)
        res=self.name
        return iup.CLOSE
    end}
local btn_cancel = iup.button{name="cancel", title="Cancel",
    action = function(self) res=self.name return iup.CLOSE
    end}
local btn_help = iup.button {name="help", title="Help",
    action = function (self) iup.Message('Help','Help Goes Here')
    end}
For each button we have defined the text for the button and the action to take when the button is pressed. Note that both the OK and Cancel button return iup.CLOSE which will cause the dialog to close when the button is pressed, where as the Help button simply shows a message.
If you prefer the actions for buttons can be defined separately using the following syntax:
function btn_ok:action()
    res=self.name
    return iup.CLOSE
end
Note the : in the function name, this means the first parameter for the function is the button itself and it can be accessed using self.
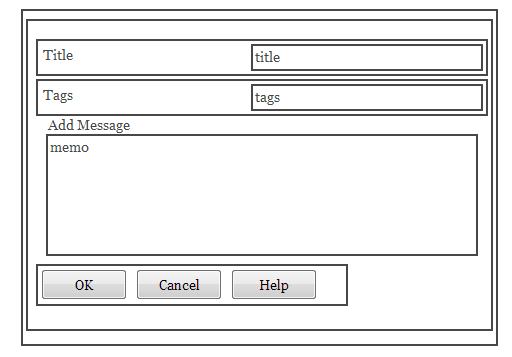
When using the iup.dialog to build a dialog you will need to use the iup.vbox and iup.hbox to arrange the controls on the dialog. In our example, we need to add a vbox and three hbox controls to control the layout, as shown below:
Now we have 3 buttons we can add a little more code so we can display the dialog:
local res
local btn_ok = iup.button{name="ok", title="OK"}

function btn_ok:action()
    res=self.name
    return iup.CLOSE
end
local btn_cancel = iup.button{name="cancel", title="Cancel", action = function (self) res=self.name return iup.CLOSE end}
local btn_help = iup.button {name="help", title="Help", action = function (self) iup.Message('Help','Help Goes Here') end}
dlg = iup.dialog{iup.hbox{btn_ok,btn_cancel,btn_help};
                          title="Sample",size="320x240",padding='10px',gap='5px',
                          close_cb=function() res='closed' return iup.CLOSE end}
dlg:show()      -- Show the dialog
iup.MainLoop()  -- Process the dialog
print(res)      -- Print the pressed button
In the code above the iup.dialog takes a table of tables and values which control the layout. The three buttons we created earlier are wrapped in iup.hbox which means that they will be shown horizontally across the layout. If you were to simply include the three buttons without the hbox they would all appear vertically one above the another.
Note the semi-colon between the fields for the dialog and the values. This is common practice to show where the controls end and the values start, but could equally be a comma. Another readability trick is the use of {} on their own to pass a table to a function iup.button{} is the same as iup.button({})
The close_cb function is called when the window close button is pressed. It’s good practice to use the return iup.CLOSE when this is pressed and set some sort of return code, especially when more than one dialog is in use as not doing so can have unexpected results.
If you run the code above in the editor, the dialog will display and you can press any of the buttons to see the results.
Adding the Text Boxes
-------------------------------------------------------- Define Text Fields
local inp_title = iup.text{name='title',expand='HORIZONTAL' }
local inp_tags  = iup.text{name='tags',  expand='HORIZONTAL' }
local inp_memo  = iup.text{name='memo',  expand='HORIZONTAL', multiline = 'YES',visiblelines = 10}
This code defines three input boxes, to keep it simple the expand option is used to tell the boxes to fill any available width on the dialog.
The memo field has its multiline option set to YES and the number of lines set to 10.
The IUP documentation always uses capital letters for attributeEvents are things that happened to an Individual and Attributes are things that described them. keywords e.g MULTILINE and their values e.g. YES, but in Lua you may use lowercase e.g. multiline and yes or mixed case e.g. Multiline and Yes. But when these values are interrogated they will always be returned in UPPERCASE.
Call back functionsA 'function' is an expression which returns values based on computations. Typically, functions require data to be supplied to them as 'parameters'. A function in Family Historian is similar to a 'function' as used in spreadsheet applications (such as MS such as action and close_cb must always be in lowercase.
The names following iup. must use the correct letter case:
- Tables such as
iup.button { }andiup.hbox { }with curly brackets must be in lowercase. - Constants such as
iup.CLOSEandiup.CENTERwithout any brackets must be in UPPERCASE. - Functions such as
iup.Message( )andiup.MainLoop( )with parentheses must be in MixedCase.
When defining the controls, the sequence they are added effects which controls can see others. So the text controls are best placed before the buttons in the sourceSource: "where information was found". This could be anything from an archive in a county records office, a book, or even a relative's recorded recollection. Citing your Sources helps to show how you reached a particular conclusion about an Individual., so that they can be accessed when we come to add some validation to the form.
dlg = iup.dialog{
            iup.vbox{
                     iup.hbox{iup.label{title='Title',size='20'},inp_title},
                     iup.hbox{iup.label{title='Tags',size='20'}, inp_tags},
                     iup.label{title='Memo'},inp_memo,
                     iup.hbox{btn_ok,btn_cancel,btn_help;padding='10',gap='5'}
                     ;padding='5',gap='5',nmargin='20x20'
                     },
             title='Sample',padding='10',gap='5', size='320',
             close_cb=function() res='closed' return iup.CLOSE end}
Next update the dialog to include the new fields. As mentioned earlier we have added vbox and additional hbox controls to put the labels and the iup.label which is a simple control is added directly to provide titles for the text boxes.
Adding Some Validation
When prompting the user for input, it’s very useful to check all the values before closing the form. This can be done on pressing the OK button using the action function.
To highlight the field we will turn the background of the field in error to red and put out a red message on the dialogue. When using colours on a dialog it can be helpful to define the colours as variables or a table to they can be reused easily.
For our validation we need to colours a ‘red’ and a pink for the background. At the start of the code add
local color = {error = '255 200 200',red = '255 0 0'}
The color table can easily have additional colours added for other uses.
Next we need to add a iup.label to the form and this time it needs a name as we need to change the value after the form is displayed. Add the following after the definitions of the input controls.
local lab_message = iup.label{title=' ',fgcolor=color.red, expand='HORIZONTAL'}
Add the lab_message into the dialog table, before the buttons.
Next we can add some logic to the btn_ok:action to check that the title field is not blank and show a message if it is.
function btn_ok:action()
    res=self.name
    if inp_title.value =='' then
       inp_title.bgcolor = color.error
       lab_message.title = 'Please Enter Title'
    else
    return iup.CLOSE
    end
end
If you now run the code and don’t enter a value for the title the field will go red and an error come up. However if you then enter the title it will stay red. To avoid this we can add a function on the title field so that when it is changed the error status is reset
-------------------------------------------------------- Reset Error Markers
function inp_title:action() self.bgcolor = DLGBGCOLOR lab_message.title = '' end
This needs too be added after both inp_title and lab_message are defined.
Using the Values
Once your user has pressed OK, all the values you require are stored against the controls. So you can access the title using inp_title.value, these values are available until you issue a destroy against the dialogue. If you are calling a dialog in a function and wanting the return the values you will therefore need to copy the values to temporary variables before calling the destroy function.
The Finished Example
local res,sTitle,sTags, sMemo
local color = {error = '255 200 200',red = '255 0 0'}
-------------------------------------------------------- Define Text Fields
local inp_title = iup.text{name='title',expand='HORIZONTAL' }
local inp_tags  = iup.text{name='tags',  expand='HORIZONTAL' }
local inp_memo  = iup.text{name='memo',  expand='HORIZONTAL', multiline = 'YES',visiblelines = 10}
inp_tags.value = 'sample,tag,values'
local lab_message = iup.label{title=' ',fgcolor=color.red, expand='HORIZONTAL'}
-------------------------------------------------------- Reset Error Markers
function inp_title:action() self.bgcolor = DLGBGCOLOR lab_message.title = '' end
-------------------------------------------------------- Define Buttons
local btn_ok = iup.button{name='ok', title='OK'}
function btn_ok:action()
    res=self.name
    if inp_title.value =='' then
       inp_title.bgcolor = color.error
       lab_message.title = 'Please Enter Title'
    else
    return iup.CLOSE
    end
end
local btn_cancel = iup.button{name='cancel', title='Cancel', action = function (self) res=self.name return iup.CLOSE end}
local btn_help = iup.button {name='help', title='Help', action = function (self) iup.Message('Help','Help Goes Here') end}
-------------------------------------------------------- Define Dialog
dlg = iup.dialog{
            iup.vbox{
                     iup.hbox{iup.label{title='Title',size='20'},inp_title},
                     iup.hbox{iup.label{title='Tags',size='20'}, inp_tags},
                     iup.label{title='Memo'},inp_memo,lab_message,
                     iup.hbox{btn_ok,btn_cancel,btn_help;padding='10',gap='5'}
                     ;padding='5',gap='5',nmargin='20x20'
                     },
             title='Sample',padding='10',gap='5', size='320',
             close_cb=function() res='closed' return iup.CLOSE end}
-------------------------------------------------------- Show Dialog
dlg:show()      -- Show the dialog
iup.MainLoop()  -- Process the dialog
print(res)      -- Print the pressed button
if res == 'ok' then
  sTitle = inp_title.value
  sTags  = inp_tags.value
  sMemo  = inp_memo.value
end
dlg:destroy()   -- Clean up the dialog, note all dialog controls are destroyed as well
print(sTitle,sTags,sMemo)
Centre a Set of Buttons or other items in the Window
To do horizontal centring you need to use the iup.fill object. Placing one on each side of the code you want centred.
require( "iuplua" )

b1 = iup.button {title='button 1'}
b2 = iup.button {title='button 2'}

dlg = iup.dialog {
iup.hbox { iup.fill {},b1,b2,iup.fill {}}
;
margin=20,padding=10, size='400x100', title = "Centered Buttons"
}
dlg:show()
iup.MainLoop()
N.B Do not use EXPANDCHILDREN='YES' on the container for the hbox or the centring will not work.
More Examples
There are lots of examples of building dialogues on A Basic Guide to using IupLua